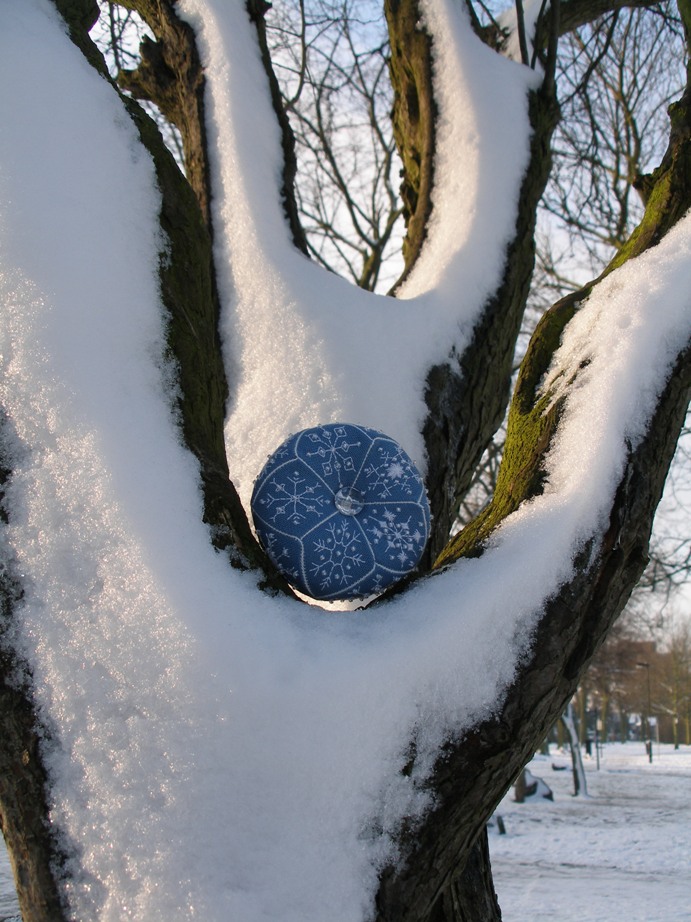
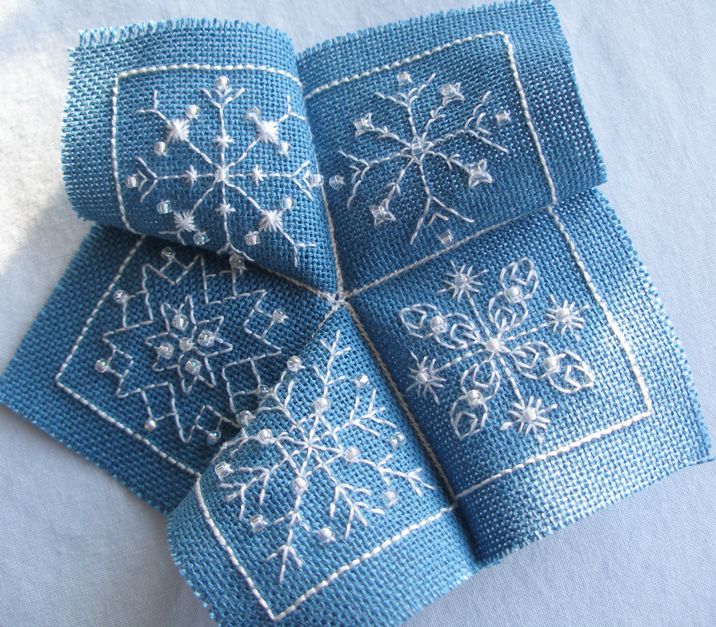
I've been a bit distracted from my planned stitching recently (this seems to be happening faaar too regularly these days) by the above 15 sided biscornu or banurukotti. I first saw these last year here on this Russian blog and then saw that Anita had designed this lovely one too. Somehow the idea of making this kind of thing with a snowflake pattern caught my imagination, but I just didn't manage to find the right snowflakes to stitch.
At last, a couple of weeks ago, I saw this post from Janet Perry for the snowflakes on her December twinchy. That got me started! Janet's snowflakes were just perfect for what I wanted to do, so I printed off the charts and got started.
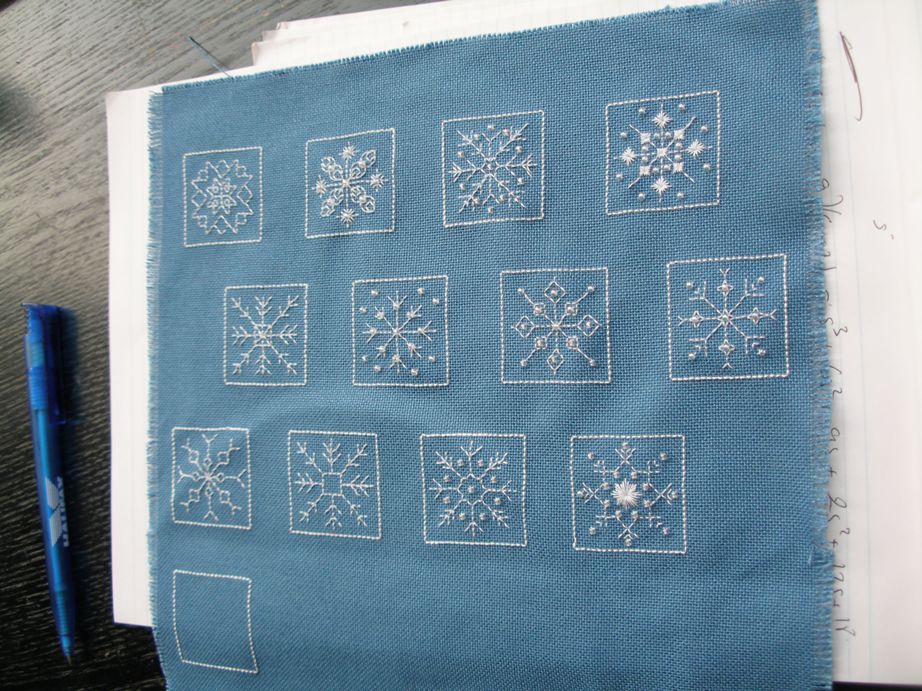
As I got going, I started playing around with Janet's snowflakes, adding beads and trying out different shapes and stitches. And before I knew it, I had ended up with 15 squares each with a different showflake!
Four of the snowflakes are Janet's, one or two were copied from images I found on the internet and the rest are my own. I might chart some of them sometime to share.
As all the tutorials I've seen for this type of biscornu have not been in English, I thought I'd write my own for anyone who's interested.
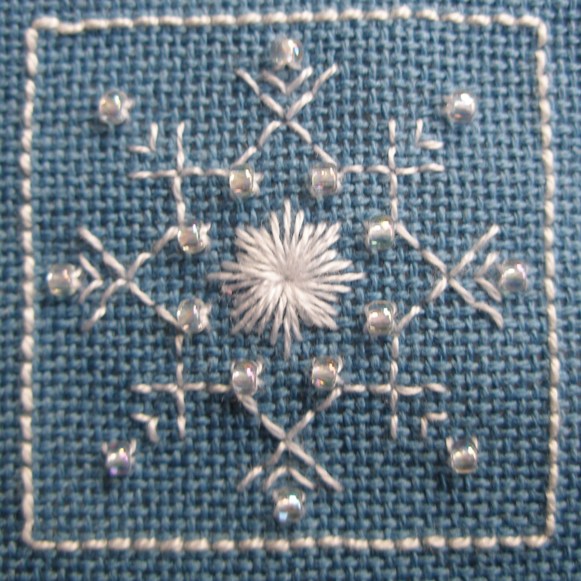
Step 1 - You need 15 stitched squares all the same size. The squares I used were all 20 x 20 stitches. As with a 'normal' biscornu, the outline round the edge of each square was done in backstitch and I used a #12 perle cotton.
When you have your 15 squares, cut them all out leaving a border of at least about half a centimeter.

Step 2 - I then divided my squares into 3 groups of 5 squares - 5 squares for the top, 5 squares for the bottom and 5 for the sides.
|
|

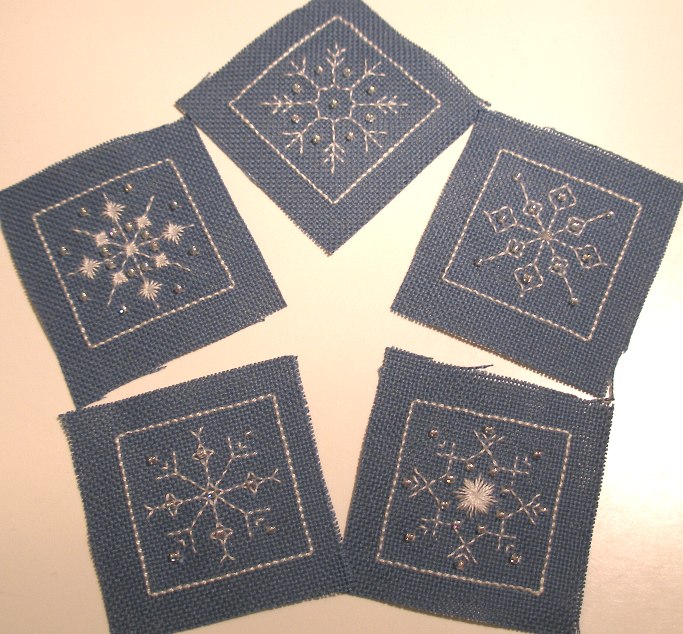
I then whipstitched the 5 squares for the top together.

When you have joined the 5 squares together, you will have a kind of 5 pointed star. Note that it will not lie flat, however hard you try.
Now, join the 5 squares for the bottom.
|
|

Step 3 - The next step is to join the side squares to either top or bottom. I've tried to show in the photo below how this works with the arrows showing which sides wshould be joined to each other.

You will end up with something like this.

Step 4 - Now you can start to join the bottom/top to the top/bottom plus sides in a similar way to that in which the sides were already joined. I haven't got a photo of this step - not quite sure how I would show it!
Only join about three quarters of the way round so that you leave a gap for stuffing. I use a general toy stuffing to stuff my biscornus.
Now, this is a point that I've never seen written anywhere for biscornus or anything else. When I make a biscornu, I sew on the central buttons before I've completed stuffing. I like to have my button in a reasonable indent in the middle of my pin cushion, so, in this case, I half stuffed my biscornu and then attached my button. Then I completed stuffing, working the stuffing around the threads holding the buttons, and stitched the opening closed.
Et voila!
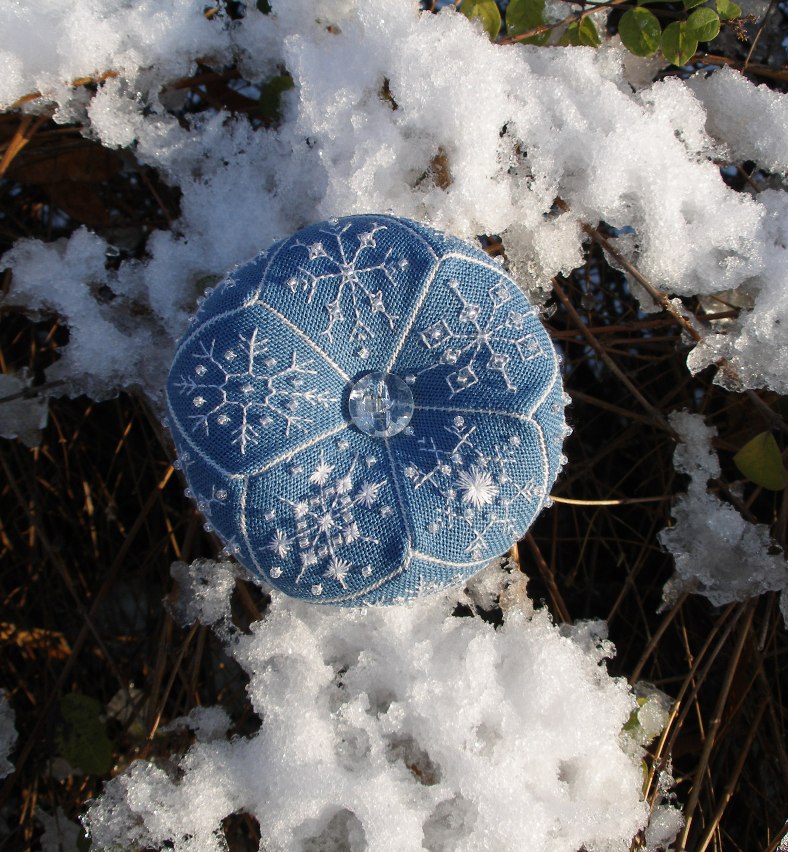
And if anyone saw a mad woman yesterday morning, wandering round Vicky Park with a pin cushion and a camera, yes, I confess, it was me!
~~~~~~~~~~~~~~~~~~~~~~~~~~~~~~~~~~~~~
And before I forget, you can still sign up for my PIF! I'll leave signups open until next Monday and then let you know the result. And for those who've asked, I'm quite happy to post overseas, so don't let that put you off!
~~~~~~~~~~~~~~~~~~~~~~~~~~~~~~~~~~~~~
The snowflake patterns I used in making my biscornu can be found on the following web pages of my blog:
Remember, I also used Janet Perry's December twinchy snowflakes. This gives you 12 snowflakes. I don't have another 3 to share at the moment, so you can either make up your own or wait patiently until I get around to thinking of some more.
85 comments:
Wow girl I am so very impressed. I am supposed to be catching up on my blog reading and instead I am sitting here fascinated by your biscornu. I think it is just beautiful. I love the colors the snowflakes and how beautifully it went together. I will print out your directions for the day I am brave enough to try that LOL
That is totally fabulous! And thanks for the detailed tutorial also. Interesting tip about sewing on the buttons. I'll try that on my next one (not 15 - sided though... I don't think I have the patience!).
I had seen those russian directions and wondered how easy it would actually be in practice. With your instructions it looks doable. Thanks for being the brave one to try it out!
That's just gorgeous! I hope you don't mind if I steal your ideas...
That is so lovely, I've never seen the instructions for one of these before, so the tutorial was pretty inspiring. You will drag me back to my stitching if you keep this up, and then what will I do with all the wool?
wow...it is pretty
Well that's just gorgeous :) You did a great job!
Your finished piece is just fabulous, and thank you so much for posting the "process" pictures. They are very helpful!!
Thank you for the tutorial, Lesley!! This is such an intriguing design!! Yours looks fabulous!
Stunning! Gorgeous! So unusual!
Hi Lesley,
Thanks for the visit and lovely comment. I love your latest finish, very well done. Thanks for the tutorial, clear and easy to follow.
Happy stitching!
He Lesley lovely piece of work, well done
Hugs
Erna
That is so beautiful. Your stitching is really lovely. x
How cool is that! what a super thing, didn't see you on local news so you couldn't have been that bonkers!!!!
What a stunning biscornu Lesley!
Great job on finishing it
WOW... that's really neat! Great finishing job; thanks for the tutorial :)
Great job on finish, lovely form and colors.
Thanks for the visit and lovely comment.
Enjoy stitching!
Wow, Lesley, your biscornu is a real beauty:)
Absolutely on my list :) Which is quite full... I will find something that has 20 squares... sometime... till then, you did a stunning job, and I think your biscornu is the cutest!!
Laura
Thank you so much for sharing this tutorial and the pics of your project. It is so very, very beautiful. I haven't even made one biscornu yet so I am so impressed with yours.
Wonderful little snowflake biscornu..of the Russian kind, Lesley! You were so kind to photo the tutorial, as well. I love your blue blog design! Hugs, Deb
A great tutorial for this! I've even shared it with a group or two that I am a part of. Hope you don't mind. I always posted a direct link to this post.
Fantastic biscornu. I really love the way it turned out. I haven't made a regular one yet though let alone one that complicated.
I think your finished piece is just outstanding. The tutorial is a great touch, nice to have it in English for a change. I just started my first 15 sided Biscornu. Tiny blackworks, to be given out one per day so it's going to take all month, but I'm really looking forward to it.
Thank you!
What a good and lovely tutorial! Thank you very much for sharing this! One day I will try ...
Greetings, Carolien
Spectacular....I will now need to find 15 tiny treasures to chart into this Biscornu! Please enroll me in your PIF....I am at www.thepurplethread.blogspot.com
Thanks so sharing...
OMG!! This is just amazing!!!!!
So beautiful!!!!!
And thanks for the tutorial!!!
That's beautiful, great job!!
It's unbelievably wonderful! I like biscornus myself, but the stitching together of that would put me off! You did a fabulous job!!
What a beauty this biscornu is!
You are very creative in the way you adapted the snowflakes.
Thanks for the tutorial - no immediate plans to make one but one day hopefully....
Margaret
Glad to see that someone else is also discovering the joys of biscornu only recently ^^ for some reason your photos aren't coming up on screen so I'll check back again later. both my daughter and I are tackling our first ever biscornu . . . so far I have both squares and she has a front (I think I'm doing the back for her) and we've already sorted beads and buttons for finishing touches! Could be a woman in France soon rushing around with camera and pin cushions LOL.
photos have appeared and I have to say WOW! it's nothing like the one I'm doing ^^ On French sites, biscornu are more commonly made with just TWO squares, making an 8 point cushion . . . hopefully you'll be able to see mine on my blog by early next week.
I think your biscornu is fantastic. Just beautiful. Thanks for sharing your tutorial with us.
Lovely,-)) And guess what??? I am actually stitching this piece too, two more squares to go and then....yeahh this is the only finish I really like to do...Biscornus;-))
Have a nice weekend,
Gaby
Hi
How can I get a copy of your Biscornu pattern?
sgvchicago@aol.com.....I have also designed one and you can see it on my blog! I will trade you pattern for pattern....
www.thepurplethread.blogspot.com
Sharon
Thank you for this wonderfully clear tutorial!!!
(Have just finished one and it couldn't have been easier.)
Used the same principle i.e. joining a few pieces together to form modules and then joining those modules when I did my biscofleur making the finishing really straightforward.
Your snowflake biscornu is gorgeous, Lesley!
Anke
I'm finding it hard to read this blog...because the blue flowers on my left are in the way of the writing, so the writing is partially hidden.
Interesting concept and if I can find a way to "SEE" all the writing, I might save and try this method.
Great tutorial!! I have another way to put these together but I am blog illiterate so it will be a while before I try a tutorial. Love your blog thanks for all the help. Oh I don't find it hard to read at all. LOL
Shay
thanks for this tutorial !
I'm going to try this soon, when I get some more Aida. I've done the normal, two-sided biscornu which I found quite easy, so I want a bigger project! :P
Hi, Lesley...this is so beautiful! I would like to have a go at making a 15-sided pincushion, and would like to blog about it, as well. I'm linking back to this page, if that's okay, to show peope where I got the idea. May I have permission to use a photo of your finished Snowflakes In The Snow? Thanks, Nat
Beautiful!!I like your photography.thanks for sharing!!
Great photos. I think the simplicity of the color scheme highlights the pretty variation in the snowflake design.
Indeed a very interesting blog. Read a pleasure. Cognitive information that is very good.
It looks very nice. I would like to make it using some different color. keep working and posting variety of articles..........
Smith Alan
You did a great job there.those snowflakes looks so much beautiful in the snow.thanks for sharing the informations of making it with us.
Wow! Its looking So beautiful.... Really Its an amazing tutorial found here, Very interesting. Thanks a lot for the share.....
I recently came across your blog and have been reading along. I think I will leave my first comment. I don’t know what to say except that I have enjoyed reading. Nice blog. I will keep visiting this blog very often.
I have a different way to put these together yet I am blog illiterate so it will be a while before I try a tutorial. Enjoy your blog thank you all the help. Oh I wouldn't find it hard to read at all.
There are may person searching about that now they will find enough resources , I am also searching more new blogs .
Thank you so much for living a comment on the Russian site otherwise I wouldn't find yours! I was wondering over that site without understanding the how to do! Many many thanks for a life saving comment :)) I am just starting seeing your blog and I am sure I will enjoy it. Best wishes for a wonderful spring and great stitching. TY
merci beaucoup.
Thanks a lot!
Great work!
amw
Keep updating about this type of info. I love this blog and i will try to share this with my friends.
Lovely blog, I think you are very knowledgeable about this topic.
free dating sites
Great artistic work, This take some talent to do.
free dating
Wow, there is a great deal of useful data above!
The positive comments and do well wishes are very motivational and greatly appreciated.
This is really fantastic tutorial i would like to apply this.amazing design.Thank you for sharing.
What a good and lovely tutorial! Thank you very much for sharing this! One day I will try ...
Hi, thank you for sharing this great info. Was just browsing through the net in my office and happened upon your blog. It is really very well written and quit comprehensive in explaining with a very simple language.
Well, I do not really imagine it is likely to have effect.
You’ve written nice post, I am gonna bookmark this page, thanks for info. I actually appreciate your own position and I will be sure to come back here.
It is very interesting for me to read that article. Thank author for it. I like such topics and everything connected to this matter. I definitely want to read more soon.
Brilliant post and useful information…I think this is what I read somewhere…but
I don’t know with your experience...
I am incomparable to enjoy myself when i appreciate your beautiful article from my deep heart!
Nossa!!! Muito bonito!!! Estou te seguindo, visite meu blog e me siga também!!!
www.cantinhodasartess.blogspot.com
I'm still learning from you, but I'm trying to achieve my goals. I certainly enjoy reading all that is posted on your blog.Keep the information coming. I loved it!
natural supplements
Thanks, Gannett Web site has collected data "the newsroom of the future." It will benefit all the people. appreciate the idea. and Yours truly
What I found different in your article is the way you have gone about to explain the topic in a simplistic way. Can't wait to have a try!
I see the article quiet critical. Thanks for sharing anyways, nice to hear
different opinions on that topic.
3d ultrasounds
4d ultrasounds
4d3d ultrasounds
hier findest du Online Hopbbyhuren
I think your post is very interesting. You have this unique design and you can make it with bare hands. The steps in making is much more easier with the help of some illustrations. Keep up the good work.
phone spyware
cell phone spyware
mobile phone spyware
phone spy ware
It's really beautiful work.Thanks for this kind of stuff.I mean I am totally impressed.Hope to see more updated work here.Ihave to say, it is very informative.
A beautiful and high quality information.this paper is accurate to be useful. Thanks to the author.
Very good blog, keep up the good work, thank you!
"Thanks for sharing, nice post.
i follow you hope you could visit me here and follow me too,, thanks."
Logo Design
Oh my goodness! Thank you so much! They are just beautiful! I will be trying this very soon.
Sell used goods
Hey, there's a great deal of helpful information above!
Thank you been doing needlepoint for 20 years and wanted a change your snowflake biscornu is beautiful thanks for the easy instructions hopefully mine will turn out that way.
jacki
Brilliant! Thank you for sharing this with us. I was hesitating before starting one of these but now understand the concept :-)
Alana (EskrimaDiva)
That's just gorgeous! I hope you don't mind if I steal your ideas..
I had seen those russian directions and wondered how easy it would actually be in practice. With your instructions it looks doable. Thanks for being the brave one to try it out!
Thank you been doing needlepoint for 20 years and wanted a change your snowflake biscornu is beautiful thanks for the easy instructions hopefully mine will turn out that way.
ninonurmadi.com
ninonurmadi.com
ninonurmadi.com
ninonurmadi.com
ninonurmadi.com
ninonurmadi.com
ninonurmadi.com
ninonurmadi.com
ninonurmadi.com
Post a Comment